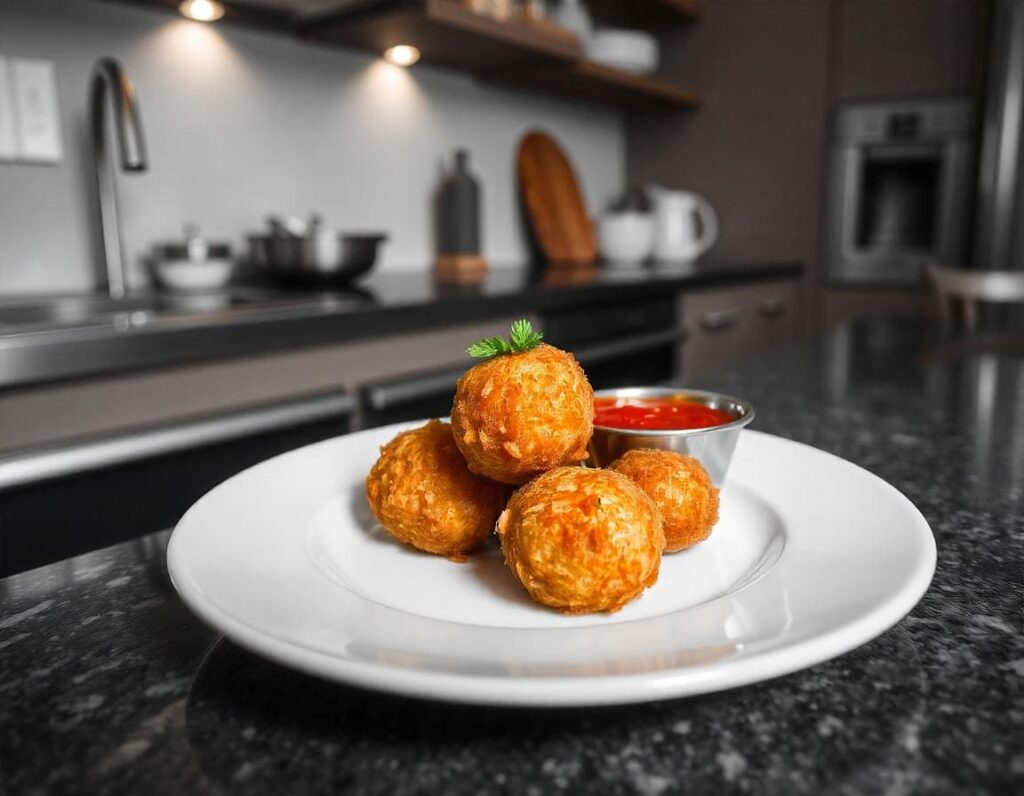
Have you ever bitten into a crispy, golden ball of deliciousness and wondered how something so simple could taste so magical? That’s the charm of arancini—a beloved Italian snack with humble origins. These deep-fried rice balls, stuffed with flavorful fillings, are a staple in Sicilian cuisine and have gained fans worldwide.
In this guide, we’ll walk you through everything you need to know about making the perfect arancini at home. From understanding their history to crafting the ideal risotto base, you’ll soon be frying up golden perfection. Let’s get started!
What Are Arancini?
Arancini, whose name means “little oranges” in Italian, are rice balls typically filled with ingredients like ragù, mozzarella, and peas. They’re rolled in breadcrumbs and fried to a crispy, golden perfection. The name reflects their shape and color, resembling oranges when cooked.
These snacks are more than just a treat—they’re a symbol of Italian culinary creativity. Originating in Sicily, arancini have been enjoyed since the 10th century, adapting over time to include regional twists and modern innovations. For example, their creamy risotto base shares similarities with Italian Risotto with Saffron (Risotto alla Milanese), another rich dish that highlights the magic of Italian rice recipes.
Ingredients Needed for Arancini
Creating arancini from scratch is easier than you think. Here’s a breakdown of what you’ll need:
Essential Ingredients
- Rice: Arborio or Carnaroli rice are the top choices (we’ll dive into this next).
- Fillings: Traditional options like ragù (meat sauce), mozzarella, and peas are a must.
- Breadcrumbs: For the signature crunchy coating.
- Eggs: To bind the rice and hold the breadcrumbs in place.
- Flour: For dredging before coating.
Optional Ingredients
- Saffron: For a vibrant yellow color and earthy flavor.
- Herbs and Spices: Parsley, thyme, or nutmeg for added aroma.
- Alternative Fillings: Mushrooms, sun-dried tomatoes, or prosciutto for a creative twist.
If you’re curious about experimenting with Mediterranean-inspired flavors, consider trying fillings inspired by dishes like Mediterranean Rice and Bean Stuffed Peppers.
Choosing the Right Rice
If there’s one secret to perfect arancini, it’s the rice. Choosing the right type ensures a creamy risotto base that holds its shape during frying.
Why Rice Matters
The rice you choose should have a high starch content to create the creamy texture essential for binding. Long-grain rice isn’t ideal as it tends to be too dry and separate easily.
Best Rice Varieties
- Arborio: A classic choice, widely available and easy to work with.
- Carnaroli: Known as the “king of rice,” it’s slightly firmer and perfect for holding its shape.
- Sushi Rice: A great alternative if you can’t find Italian varieties. Its stickiness works wonders.
Pro tip: Always rinse your rice lightly before cooking to remove excess starch but not so much that it loses its binding ability.
Preparing the Risotto Base
The foundation of any great arancini is a well-made risotto. For guidance on crafting an authentic saffron risotto base, check out this recipe for Italian Risotto with Saffron (Risotto alla Milanese). It’s a staple that not only highlights the rich flavor of saffron but also serves as a versatile starting point for many Italian dishes.
Here’s how you can master this key step:
Ingredients for Risotto
- Arborio or Carnaroli rice
- Chicken or vegetable broth (warm)
- Onion (finely chopped)
- Butter and olive oil
- White wine
- Grated Parmesan cheese
Step-by-Step Guide
- Sauté the Onion: In a large pan, heat olive oil and butter. Add finely chopped onion and sauté until translucent.
- Toast the Rice: Stir in the rice and toast it for 2-3 minutes to release its nutty aroma.
- Deglaze with Wine: Pour in a splash of white wine, letting it evaporate while stirring.
- Add Broth Gradually: Add warm broth one ladle at a time, stirring continuously until the liquid is absorbed. Repeat until the rice is cooked al dente (this takes about 18-20 minutes).
- Finish with Parmesan: Stir in grated Parmesan and an extra knob of butter for creaminess.
Let the risotto cool completely before using it for arancini. Spreading it out on a baking sheet can speed up the cooling process.
Flavoring the Risotto
A good risotto is already delicious, but adding the right flavors takes your arancini to the next level.
Classic Additions
- Saffron: Dissolve a pinch in warm broth before adding it to the risotto. This gives the rice a gorgeous golden hue and a subtle, earthy taste.
- Herbs: Chopped parsley, thyme, or rosemary can be stirred in for a fresh touch.
Boosting Flavor
- Broths: Homemade chicken or vegetable broth will impart deeper flavor than store-bought options.
- Wine: Dry white wine, like Sauvignon Blanc or Pinot Grigio, adds a hint of acidity and complexity.
Experiment with combinations to find the perfect balance for your taste buds. For example, adding nutmeg pairs beautifully with creamy fillings like béchamel or ricotta.
Popular Arancini Fillings
The filling is where arancini truly shine. Traditional recipes like ragù, mozzarella, and peas are classics, but don’t hesitate to explore creative Mediterranean-inspired fillings, like those found in Mediterranean Rice and Bean Stuffed Peppers, for a fresh twist.
Traditional Fillings
- Ragù: A rich meat sauce made with ground beef, tomatoes, and herbs. It’s the quintessential Sicilian choice.
- Mozzarella: Gooey and melty, mozzarella adds a satisfying stretch with every bite.
- Peas: Sweet peas are often added to balance the savory flavors of the meat and cheese.
Creative Variations
- Mushrooms: Sautéed mushrooms lend an earthy flavor perfect for vegetarians.
- Spinach and Ricotta: A creamy, nutrient-packed option that’s light yet satisfying.
- Seafood: Shrimp or crab fillings create a luxurious twist on this classic snack.
Feel free to mix and match these fillings to make your arancini uniquely yours. Whether you stick to tradition or experiment, the result will always be delicious.
Shaping the Rice Balls
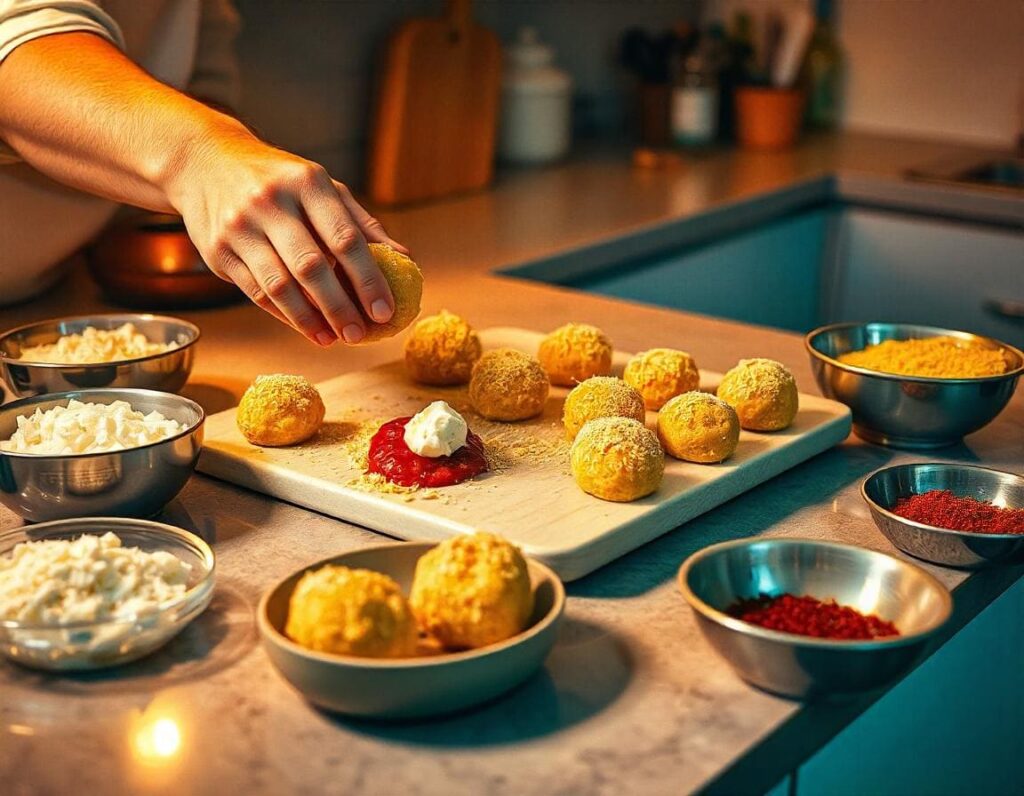
Perfectly shaped arancini aren’t just about aesthetics—they ensure even cooking and a uniform crunch. Here’s how to get them just right.
Step-by-Step Shaping
- Scoop the Rice: Use a large spoon or ice cream scoop to portion the rice evenly.
- Flatten and Fill: Flatten each portion in your hand, creating a small indentation for the filling. Add about a teaspoon of your chosen filling.
- Seal and Shape: Gently fold the rice around the filling, rolling it into a ball. Press firmly to ensure the filling is fully enclosed.
Tips for Success
- Wet Your Hands: Dipping your hands in water prevents the rice from sticking while shaping.
- Consistent Size: Aim for golf ball-sized arancini to ensure they cook evenly.
- Firm Packing: Compact the rice enough to hold its shape but not so tight that it becomes dense.
Breading and Coating Techniques
The crispy exterior is what makes arancini irresistible. A well-executed coating ensures the perfect crunch every time.
The Breading Process
- Dredge in Flour: Roll each rice ball lightly in flour to help the egg stick.
- Dip in Egg Wash: Submerge the floured balls in beaten eggs, coating them completely.
- Roll in Breadcrumbs: Finally, roll the balls in breadcrumbs, pressing gently to adhere.
Choosing Breadcrumbs
- Traditional Breadcrumbs: Fine-textured and classic for Italian arancini.
- Panko Breadcrumbs: These Japanese breadcrumbs create an extra-crispy coating.
- Seasoned Options: Add grated Parmesan, dried herbs, or garlic powder to the breadcrumbs for added flavor.
Double-coating the arancini (repeating the egg wash and breadcrumb steps) can enhance the crunchiness, especially if you plan to bake or air-fry.
Frying Methods
Traditional arancini are deep-fried to achieve their iconic golden crust. If you’re new to frying, follow these tips to ensure a mess-free and delicious experience.
Deep-Frying
- Oil Selection: Use neutral oils with high smoke points, such as vegetable or canola oil.
- Temperature Control: Maintain the oil at 350°F (175°C) for even cooking. A thermometer is your best friend here!
- Cook in Batches: Fry a few arancini at a time to avoid overcrowding and ensure consistent results.
Shallow-Frying
If you’re short on oil or prefer a slightly lighter option:
- Use a skillet with about an inch of oil.
- Turn the arancini frequently to brown them evenly on all sides.
Drain the cooked arancini on a wire rack or paper towels to remove excess oil. Sprinkle them with a pinch of salt while they’re still hot for an extra pop of flavor.
Baking and Air-Frying Options
Looking for a healthier alternative to deep-frying? Baking and air-frying are excellent ways to enjoy arancini without sacrificing too much of their signature crunch. If you’re curious about how different cooking methods can impact results, explore the pros and cons in Is it Better to Pan Fry or Oven Cook Salmon?—a discussion that highlights the nuances of each technique.
Baking Arancini
- Preheat the Oven: Set it to 400°F (200°C).
- Prepare a Baking Tray: Line it with parchment paper and lightly grease it with olive oil.
- Brush or Spray with Oil: After breading the arancini, brush them with olive oil or use a cooking spray for even coverage.
- Bake Until Golden: Place the arancini on the prepared tray and bake for 20-25 minutes, flipping them halfway through.
Air-Frying Arancini
- Preheat the Air Fryer: Set it to 375°F (190°C).
- Lightly Oil the Basket: Spray the air fryer basket with nonstick cooking spray.
- Arrange in a Single Layer: Place the arancini in the basket, ensuring they’re not touching.
- Cook in Batches: Air fry for 12-15 minutes, shaking the basket halfway through for even cooking.
Tips for Best Results
- For extra crispiness, double-coat the arancini before baking or air-frying.
- Serve immediately for maximum crunch, as baked and air-fried arancini can lose their crispiness faster than fried ones.
Serving Suggestions

Now that your arancini are ready, it’s time to serve them in style! While they’re delightful on their own, pairing them with complementary sides and sauces can elevate your experience.
For a Mediterranean-inspired feast, consider serving arancini alongside a dish like Italian Shakshuka: A Mediterranean Twist on a Classic Dish or alongside fresh salads with bold, tangy flavors.
Traditional Accompaniments
- Marinara Sauce: A classic pairing that adds a tangy, herby flavor to every bite. Serve warm for dipping.
- Lemon Wedges: A squeeze of fresh lemon brightens the dish and balances the richness.
Creative Pairings
- Aioli: Garlic or spicy aioli provides a creamy contrast to the crispy arancini.
- Side Salad: A light green salad with a lemon vinaigrette makes for a refreshing combination.
- Wine Pairing: A chilled glass of white wine, like Pinot Grigio or Sauvignon Blanc, complements the savory flavors beautifully.
Whether served as an appetizer, snack, or part of a larger meal, arancini are guaranteed to impress.
Storing and Reheating Arancini
Made too many arancini? No problem. These delightful rice balls can be stored and reheated with ease.
Storing Arancini
- Refrigeration: Place leftover arancini in an airtight container and refrigerate for up to 3 days.
- Freezing: For longer storage, arrange the arancini on a baking sheet, freeze until solid, then transfer to a freezer-safe bag. They’ll keep for up to 2 months.
Reheating Arancini
- Oven: Preheat to 350°F (175°C) and bake the arancini for 10-15 minutes until heated through.
- Air Fryer: Heat at 375°F (190°C) for 5-7 minutes to restore crispiness.
- Microwave: Not recommended, as it can make the coating soggy.
By reheating carefully, you’ll enjoy arancini that taste almost as good as fresh
Common Mistakes to Avoid
Even experienced cooks can run into issues when making arancini. Here are some common pitfalls and how to avoid them.
1. Overcooking or Undercooking Rice
Rice that’s too soft won’t hold its shape, while undercooked rice can be unpleasantly crunchy. Always cook the risotto to an al dente texture and let it cool completely before shaping.
2. Skipping the Chill Step
Chilling the risotto mixture before shaping is crucial. It firms up the rice, making it easier to handle and less likely to fall apart during frying.
3. Insufficient Coating
A thin or uneven coating can result in arancini that leak filling or absorb too much oil. Double-coat the balls for a sturdier, crunchier shell.
4. Oil Temperature Issues
If the oil isn’t hot enough, the arancini will absorb excess oil and become greasy. Too hot, and the coating will burn before the inside is warmed through. Use a thermometer to maintain the ideal temperature (350°F/175°C).
Regional Variations of Arancini
Italy’s love for arancini extends far beyond Sicily, with different regions adding their unique twists. For a cross-cultural culinary adventure, explore other regional favorites like Gözleme: A Delicious Taste of Turkish Tradition. While not Italian, this Turkish flatbread offers a glimpse into how diverse cuisines reimagine stuffed delicacies.
Sicilian Style
The traditional Sicilian arancini are large and conical, often filled with ragù, peas, and mozzarella. They reflect the region’s Arabic influence with their use of saffron.
Roman Style
In Rome, arancini are called supplì and are typically filled with mozzarella and tomato sauce. They’re smaller and oval-shaped compared to their Sicilian counterparts.
Other Variations
- Neapolitan: Features ricotta and salami for a bold flavor.
- Venetian: Known for seafood-based fillings, like shrimp or cuttlefish.
These regional specialties highlight the versatility and creativity of Italian cuisine.
Frequently Asked Questions
1. Can I use leftover risotto to make arancini?
Absolutely! Arancini are a fantastic way to repurpose leftover risotto. Just ensure it’s fully cooled and firm before shaping.
2. What dipping sauces pair well with arancini?
Marinara sauce is a classic choice, but garlic aioli, pesto, or even spicy arrabbiata work wonderfully.
3. How do I prevent arancini from falling apart while frying?
Chill the rice mixture before shaping, and make sure the balls are tightly packed and well-coated.
4. Is it possible to make gluten-free arancini?
Yes! Use gluten-free breadcrumbs and flour to accommodate dietary needs without compromising flavor.
5. Can arancini be made vegan?
Definitely. Substitute the cheese with plant-based alternatives, use a vegetable-based filling, and replace the egg wash with a mixture of non-dairy milk and flour.
Making arancini at home might seem like a challenge, but it’s well worth the effort. These crispy, golden rice balls are a perfect blend of texture and flavor, offering endless opportunities for creativity. Whether you stick to traditional recipes or explore new variations inspired by dishes like Mediterranean Rice and Bean Stuffed Peppers or Gözleme, arancini are sure to become a favorite in your kitchen.
So, gather your ingredients, roll up your sleeves, and give it a try. Trust us—there’s nothing quite like biting into a homemade arancini fresh from the fryer. Happy cooking!

The Ultimate Guide to Making Perfect Arancini at Home
Ingredients
For the Risotto Base
- 2 cups Arborio rice
- 4 cups chicken or vegetable broth warmed
- 1 small onion finely chopped
- 2 tablespoons butter
- 1 tablespoon olive oil
- ½ cup white wine
- ½ teaspoon saffron threads optional, but adds color and flavor
- ½ cup grated Parmesan cheese
- Salt & black pepper to taste
For the Filling (Traditional Options)
- 4 oz 110g mozzarella, cubed
- 1 cup cooked ragù meat sauce with peas (for a classic Sicilian filling)
For the Breading
- 1 cup all-purpose flour
- 2 large eggs beaten
- 2 cups breadcrumbs panko or Italian-style
- Vegetable oil for frying
Instructions
Step 1: Prepare the Risotto Base
- Sauté the Onion: Heat butter and olive oil in a large pan over medium heat. Add the chopped onion and cook until soft and translucent.
- Toast the Rice: Stir in the Arborio rice and cook for 2-3 minutes until slightly toasted.
- Deglaze with Wine: Pour in the white wine, stirring until fully absorbed.
- Simmer with Broth: Add the warm broth one ladle at a time, stirring continuously until absorbed. Repeat for about 18-20 minutes until the rice is al dente.
- Add Saffron & Cheese: Stir in saffron (if using) and grated Parmesan. Season with salt and pepper.
- Cool the Rice: Spread the risotto on a baking sheet and let it cool completely (about 1-2 hours). This helps with shaping the arancini.
Step 2: Shape and Fill the Arancini
- Scoop the Rice: Take about 2 tablespoons of risotto and flatten it in your hand.
- Add the Filling: Place a small cube of mozzarella or a spoonful of ragù with peas in the center.
- Seal the Ball: Enclose the filling with rice, forming a compact ball (about the size of a golf ball). Repeat until all the rice is used.
Step 3: Bread the Arancini
- Dredge in Flour: Roll each rice ball lightly in flour.
- Dip in Egg Wash: Coat completely with beaten eggs.
- Roll in Breadcrumbs: Ensure an even, crispy coating.
- (For extra crunch, repeat the egg and breadcrumb steps for a double coating!)
Step 4: Fry the Arancini
- Heat the Oil: In a deep fryer or heavy pan, heat vegetable oil to 350°F (175°C).
- Fry in Batches: Carefully drop in 3-4 arancini at a time, frying for 3-4 minutes until golden brown.
- Drain & Serve: Transfer to a paper towel-lined plate to remove excess oil.
Serving Suggestions
- ✔ Classic Dipping Sauce: Serve with warm marinara or arrabbiata sauce.
- ✔ Fresh Garnish: Sprinkle with fresh basil or Parmesan cheese.
- ✔ Side Salad: Pair with a Mediterranean cucumber salad for a fresh contrast.
- Storage & Reheating Tips
- ✔ Refrigerate: Store in an airtight container for up to 3 days.
- ✔ Freeze: Freeze uncooked arancini for up to 2 months. Fry straight from frozen, adding 1-2 extra minutes.
- ✔ Reheat: Bake at 375°F (190°C) for 10 minutes or air-fry at 375°F (190°C) for 5-6 minutes.
Nutritional Info (Per arancini, mozzarella-filled)
- Calories: 200 kcal
- Protein: 7g
- Carbs: 25g
- Fat: 8g
Recipe Variations & Customizations
- ✔ Vegetarian Arancini: Fill with spinach & ricotta or mushroom risotto.
- ✔ Gluten-Free: Use gluten-free breadcrumbs & flour.
- ✔ Baked Version: Bake at 400°F (200°C) for 25 minutes, flipping halfway.
- ✔ Air-Fried Arancini: Air-fry at 375°F (190°C) for 12-15 minutes, shaking the basket halfway through.
Pro Cooking Tips
- ✔ Use Cooled Rice: Warm rice is too sticky and hard to shape.
- ✔ Pack Firmly: Compact the rice gently so the arancini don’t break apart.
- ✔ Oil Temperature Matters: If the oil is too hot, the outside burns before the inside melts.
FAQs
- ❓ Can I use leftover risotto?
- Yes! Leftover risotto makes perfect arancini. Just ensure it’s cold and firm before shaping.
- ❓ What’s the best cheese for arancini?
- Mozzarella is classic, but provolone or fontina work beautifully too.
- ❓ Can I bake arancini instead of frying?
- Yes! Brush them with olive oil and bake at 400°F (200°C) for 25 minutes, flipping once.
- ❓ Why are my arancini falling apart?
- Your rice may be too dry—try adding a bit more cheese or egg to bind it better.