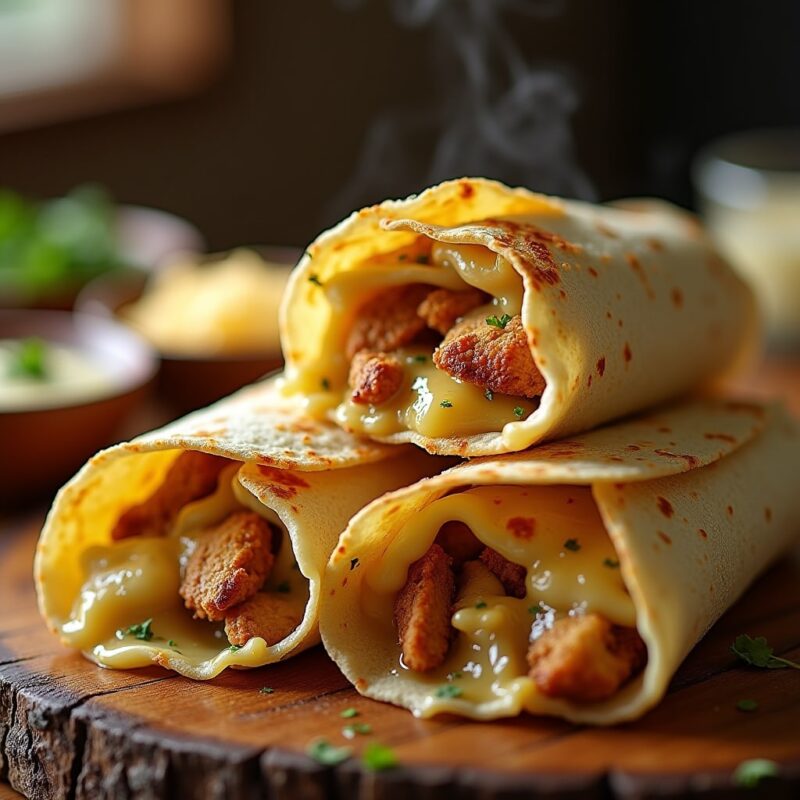
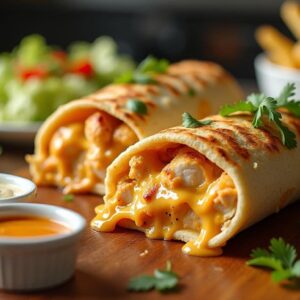
If you’re looking for a quick, satisfying, and absolutely mouthwatering meal, look no further than cheesy garlic chicken wraps! These wraps are loaded with juicy, seasoned chicken, melty cheese, and bold garlic flavors, all wrapped up in a crispy tortilla. Whether you’re making them for lunch, dinner, or a party snack, they’re guaranteed to be a hit.
In this guide, we’ll cover everything you need to know to make the perfect cheesy garlic chicken wraps—from choosing the best ingredients to step-by-step cooking instructions and delicious variations. Get ready to enjoy a meal that’s cheesy, garlicky, and absolutely irresistible!
Ingredients for Cheesy Garlic Chicken Wraps
To create the perfect cheesy garlic chicken wraps, you need the right combination of ingredients. Below, we’ll go over both the essential ingredients and optional extras that can elevate the flavor even more.
Essential Ingredients for the Perfect Wraps
These are the must-have ingredients that make up the base of your cheesy garlic chicken wraps:
Chicken Breast (or Alternative Protein Options)
- Boneless, skinless chicken breasts work best because they cook quickly and stay juicy.
- You can also use chicken thighs for extra flavor.
- Looking for a different protein? Turkey, shrimp, or tofu can be great substitutes.
Garlic (Fresh, Roasted, or Powdered)
- Fresh garlic adds a bold, pungent kick—perfect for garlic lovers!
- Roasted garlic provides a sweeter, milder flavor.
- Garlic powder works as a quick and easy alternative if you’re short on time.
Cheese (Cheddar, Mozzarella, or a Mix)
- Cheddar cheese adds a sharp, rich taste.
- Mozzarella cheese melts beautifully and gives that gooey, stretchy texture.
- A blend of both gives the best of both worlds—flavor and meltiness!
Flour Tortillas (Soft or Crispy Preferences)
- Soft flour tortillas are best for a chewy, warm wrap.
- If you prefer a crispy texture, lightly grill or toast them.
- Want a healthier alternative? Use whole wheat or low-carb tortillas.
Olive Oil, Butter, or an Alternative Fat
- Olive oil is great for cooking the chicken and brushing the tortillas.
- Butter adds extra richness when grilling the wraps.
- Avocado oil is a healthier alternative with a neutral taste.
Herbs and Seasonings (Parsley, Paprika, Salt, Pepper)
- Parsley gives a fresh, vibrant flavor.
- Paprika adds a smoky, slightly spicy kick.
- Salt and pepper enhance all the other flavors.
Optional Ingredients for Extra Flavor
If you want to take your cheesy garlic chicken wraps to the next level, consider adding some of these optional ingredients:
Sauces: Ranch, Garlic Aioli, or Spicy Mayo
- Ranch dressing gives a creamy, tangy balance to the garlic.
- Garlic aioli enhances the garlicky goodness.
- Spicy mayo adds a little heat for those who like a kick.
Veggies: Bell Peppers, Onions, or Spinach
- Bell peppers add sweetness and crunch.
- Sautéed onions give a caramelized, savory taste.
- Spinach adds a nutritious, earthy flavor without overpowering the dish.
Step-by-Step Recipe Instructions
Now that we have our delicious ingredients ready, it’s time to bring everything together! Follow these easy, step-by-step instructions to create the best cheesy garlic chicken wraps that are crispy, cheesy, and packed with flavor.
Preparing the Chicken
The secret to juicy, flavorful chicken lies in proper seasoning and cooking techniques. Here’s how to do it right:
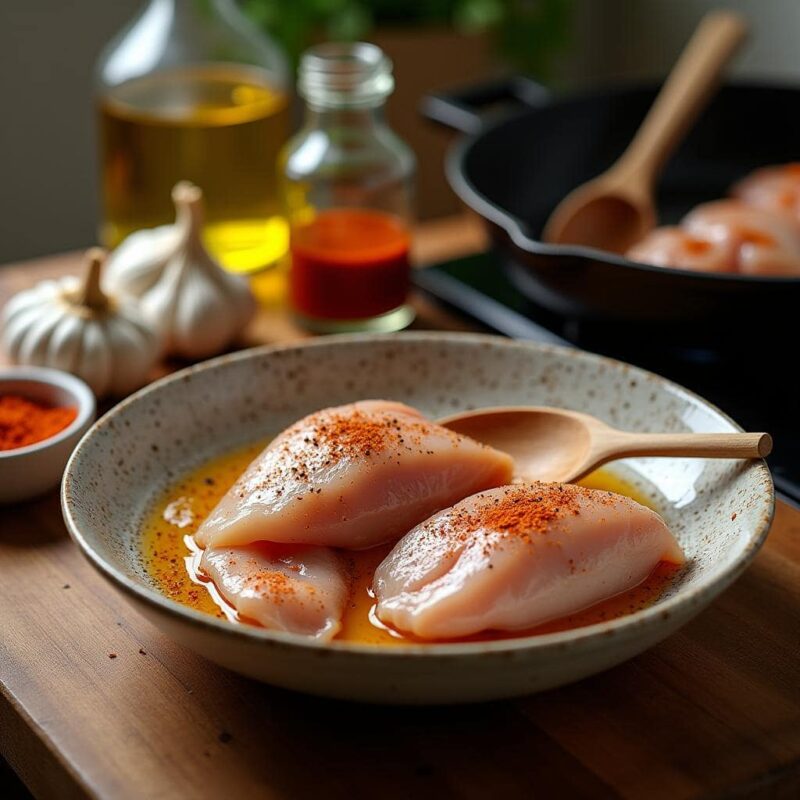
1. Seasoning and Marinating for Maximum Flavor
- Cut boneless, skinless chicken breasts into small, bite-sized pieces for even cooking.
- In a bowl, mix:
- 1 teaspoon salt
- ½ teaspoon black pepper
- 1 teaspoon paprika (for a smoky touch)
- ½ teaspoon garlic powder (extra garlic boost!)
- 1 tablespoon olive oil (helps lock in moisture)
- Let the chicken marinate for at least 15 minutes (or up to 2 hours for deeper flavor).
2. Cooking Techniques: Skillet, Grill, or Oven
- Skillet (Quick & Easy Method)
- Heat a large pan over medium-high heat.
- Add 1 tablespoon of olive oil and cook the chicken for 5-7 minutes, stirring occasionally, until golden brown and fully cooked.
- Grill (Smoky, Charred Flavor)
- Preheat the grill to medium-high heat.
- Grill the marinated chicken for 3-4 minutes per side until it gets a beautiful char.
- Oven (Less Mess, More Juiciness)
- Preheat the oven to 400°F (200°C).
- Spread the chicken evenly on a baking sheet and roast for 20 minutes, flipping halfway.
Once cooked, set the chicken aside to rest while you move on to the creamy garlic sauce.
Making the Garlic Sauce
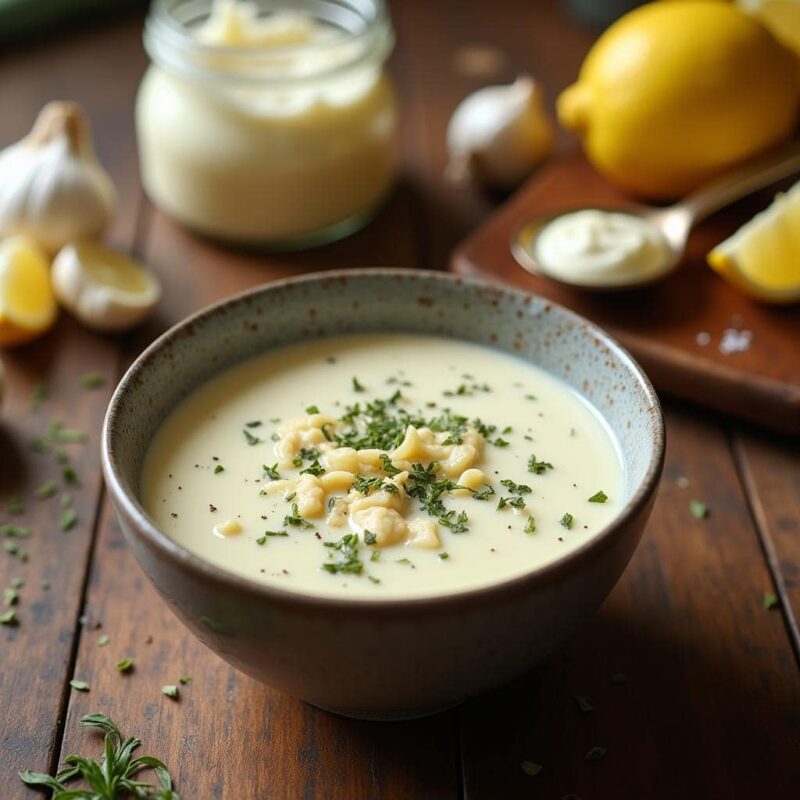
A good garlic sauce is what makes these wraps truly irresistible. You can either make a homemade creamy garlic sauce or use a store-bought alternative.
1. How to Create a Creamy, Garlicky Sauce at Home
Ingredients:
- ½ cup mayonnaise
- 2 tablespoons sour cream (or Greek yogurt for a healthier twist)
- 1 teaspoon fresh garlic (minced or grated)
- ½ teaspoon lemon juice
- ¼ teaspoon salt
- ½ teaspoon dried oregano or parsley
Instructions:
- Whisk everything together in a bowl until smooth.
- Taste and adjust seasoning (add more garlic if you love bold flavors!).
- Let it sit for 5-10 minutes to allow the flavors to blend.
2. Store-Bought Alternatives (Quick & Easy)
- Garlic aioli – Creamy and garlicky, a great substitute.
- Ranch dressing – Mild garlic flavor with a tangy twist.
- Spicy mayo – A zesty option for those who like heat.
Now that our chicken is cooked and sauce is ready, it’s time to assemble the wraps!
Assembling the Wraps
Now comes the fun part—building the perfect cheesy garlic chicken wrap!
1. Layering the Ingredients for the Perfect Bite
- Lay a flour tortilla flat on a clean surface.
- Spread a thin layer of garlic sauce over the tortilla.
- Add a generous scoop of cooked chicken.
- Sprinkle a handful of shredded cheese (cheddar + mozzarella for the best melt!).
- Optional: Add veggies like bell peppers, onions, or spinach.
2. Folding and Wrapping Techniques to Prevent Mess
- Burrito-style wrap: Fold in the sides, then roll tightly.
- Quesadilla-style wrap: Fold in half instead of rolling for a crispy, cheesy pocket.
- Press down gently to seal everything inside.
Now, let’s cook them to golden, crispy perfection!
Cooking the Wraps
A wrap is only as good as its texture—let’s get that golden, crispy exterior and melty, gooey cheese inside!
1. Best Ways to Toast or Grill Them for Extra Crispiness
- Stovetop Method (Crispy & Quick)
- Heat a non-stick skillet over medium heat.
- Add a little butter or olive oil.
- Place the wrap seam-side down and cook for 2-3 minutes per side, pressing gently with a spatula.
- Oven Method (Hands-Free & Even Cooking)
- Preheat oven to 375°F (190°C).
- Place wraps on a baking sheet and bake for 10 minutes, flipping halfway.
- Air Fryer Method (Extra Crunchy)
- Preheat the air fryer to 375°F (190°C).
- Spray wraps lightly with cooking spray.
- Air fry for 5-6 minutes, flipping once.
2. How to Melt the Cheese Evenly
- For extra cheesy goodness, cover the pan with a lid for the last 30 seconds to trap heat and melt the cheese faster.
- Use a blend of cheddar and mozzarella for the best melt.
- Shred cheese fresh for a smoother, more even melt.
And there you have it—perfectly cheesy, garlicky, crispy chicken wraps! 😍 Now, let’s dive into some pro tips to make them even better.
Pro Tips for Perfect Cheesy Garlic Chicken Wraps
Want to take your cheesy garlic chicken wraps to the next level? Here are some expert tips to help you achieve the perfect melt, maximum garlic flavor, and ultimate crispiness—without any sogginess!
For another cheesy, crispy meal idea, check out this grilled cheese with pita bread—it’s another delicious twist on a classic!
Choosing the Best Cheese for Melting
The type of cheese you choose affects both the texture and flavor of your wraps. Some cheeses melt smoothly and evenly, while others might turn oily or clumpy. Here’s a breakdown of the best cheese choices:
1. Top Melting Cheeses (Perfect for Wraps)
- Mozzarella – The king of melt! It creates that perfect gooey, stretchy texture.
- Cheddar – Adds a sharp, tangy flavor while still melting well.
- Monterey Jack – Mild and creamy with a smooth melt.
- Colby Jack – A mix of cheddar and Monterey Jack, giving the best of both worlds.
- Provolone – A slightly smoky flavor with a great melting consistency.
2. Cheeses to Avoid (Don’t Melt Well)
- Feta & Cotija – These are crumbly and don’t melt properly.
- Parmesan – It’s great for flavor but won’t get gooey.
- Blue Cheese – Strong in taste but won’t give you a smooth melt.
3. Pro Tips for the Best Cheese Melt
- Shred cheese fresh instead of using pre-shredded cheese (which contains anti-caking agents that prevent smooth melting).
- Use a cheese blend (e.g., cheddar + mozzarella) for both flavor and meltiness.
- Melt cheese evenly by covering the pan with a lid for the last few seconds.
Garlic Prep for Maximum Flavor
Garlic is the star ingredient in these wraps, so getting the right preparation is crucial. Here’s a guide to choosing the best garlic option for your taste preference:
1. Fresh Garlic (Bold & Aromatic)
- Best for those who love a strong garlic kick.
- Mince or grate for the most intense flavor.
- Be careful—raw garlic can taste sharp! Cooking it slightly in butter or oil will mellow the flavor.
2. Roasted Garlic (Sweet & Mild)
- If you want a softer, slightly sweet garlic flavor, roast a whole garlic bulb.
- To roast: Cut off the top, drizzle with olive oil, wrap in foil, and bake at 375°F (190°C) for 30-40 minutes until golden and soft.
- Roasted garlic is great for making a smooth garlic spread.
3. Garlic Powder (Quick & Convenient)
- Works well if you’re short on time.
- Has a milder, more even garlic flavor compared to fresh garlic.
- Best used in marinades or as an extra seasoning for chicken.
4. Pro Tips for Maximum Garlic Flavor
- For extra garlicky wraps, mix roasted garlic into the sauce and fresh garlic into the chicken marinade.
- Avoid burning garlic—it turns bitter quickly! Always cook it on low heat for the best taste.
- If you want a milder garlic flavor, use roasted garlic instead of raw.
Avoiding Soggy Wraps
No one likes a soggy wrap! A great wrap should be crispy on the outside while staying soft and cheesy inside. Follow these easy tricks to prevent excess moisture from ruining your wrap:
1. Don’t Overload with Wet Ingredients
- Avoid using too much sauce inside the wrap—it can soak through the tortilla.
- If adding veggies like tomatoes or spinach, pat them dry before adding.
2. Cook the Chicken Properly
- If your chicken releases too much water while cooking, drain any excess moisture before assembling the wrap.
- Cooking on medium-high heat helps prevent soggy, watery chicken.
3. Use the Right Tortilla
- Flour tortillas hold up better than corn tortillas, which can get soggy faster.
- For extra crispiness, use low-moisture tortillas (like whole wheat or gluten-free options).
4. Grill or Toast the Wrap for Extra Crunch
- Toasting your wrap in a skillet, oven, or air fryer helps seal in all the flavors while preventing sogginess.
- Lightly brush the outside with butter or olive oil for a crisp, golden crust.
By following these pro tips, you’ll create cheesy garlic chicken wraps that are perfectly crispy, melty, and bursting with flavor!
Variations & Ingredient Substitutions
Want to customize your cheesy garlic chicken wraps to fit your dietary needs or spice preferences? No problem! Below are some delicious variations and ingredient swaps to make this recipe healthier, vegetarian-friendly, or extra spicy!
Healthier Alternatives 🥗
If you’re looking for a lighter, low-carb, or gluten-free version of these wraps, try these healthy ingredient swaps:
1. Low-Carb & Keto Options
- Swap the flour tortillas for lettuce wraps or low-carb tortillas.
- Use grilled chicken thighs instead of chicken breast for a higher fat content (perfect for keto).
- Reduce the cheese slightly or use full-fat dairy alternatives.
2. Gluten-Free Wrap Options
- Use gluten-free tortillas (available in most grocery stores).
- Try corn tortillas (but note they won’t be as soft and flexible).
- Make homemade almond flour or coconut flour tortillas for a healthy twist.
3. Dairy-Free Cheese Alternatives
- Use vegan shredded cheese made from cashews, almonds, or soy.
- Nutritional yeast adds a cheesy flavor without dairy.
- Avocado slices can replace cheese for a creamy texture.
Vegetarian & Vegan Versions
If you’re looking for a meatless alternative, try these plant-based swaps while keeping all the cheesy, garlicky goodness!
1. Plant-Based Protein Swaps
- Grilled tofu (seasoned just like chicken).
- Chickpeas or black beans (adds protein and texture).
- Mushrooms (sautéed for a meaty, umami flavor).
- Jackfruit (great for a shredded, chicken-like texture).
2. Dairy-Free Cheese Alternatives
- Cashew-based cheese melts beautifully.
- Coconut or almond-based cheese works well in wraps.
- Vegan mozzarella or cheddar shreds give the same stretchy effect.
By making these swaps, you can enjoy a 100% vegan-friendly cheesy garlic wrap that’s just as delicious!
Spicy & Bold Flavors 🌶️
If you love heat and bold flavors, here are some fiery additions you can mix into your wraps:
1. Adding Heat
- Fresh jalapeños (sliced for crunch and heat).
- Pickled banana peppers (tangy and spicy).
- Chili flakes or cayenne pepper (for an easy spice boost).
2. Sauce Upgrades
- Buffalo sauce (for a tangy, spicy kick).
- Sriracha mayo (adds heat and creaminess).
- Hot honey drizzle (for a sweet and spicy contrast).
These variations let you create cheesy garlic chicken wraps with a kick of spice or a unique bold twist!
Serving Suggestions
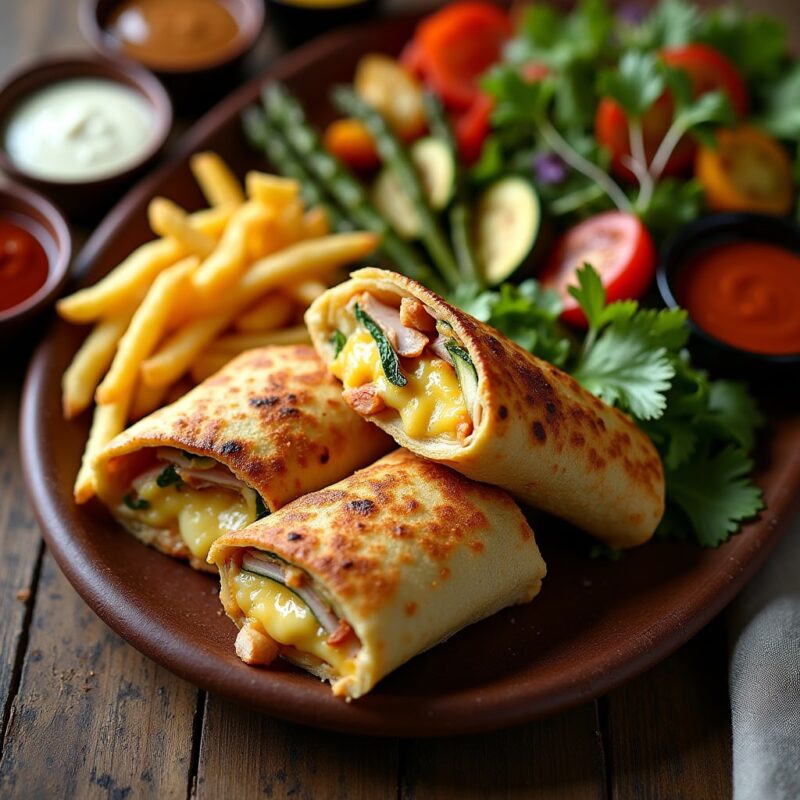
What pairs best with cheesy garlic chicken wraps? Here are some perfect sides and dips to complete your meal!
Best Side Dishes
Pair your cheesy, garlicky wraps with one of these delicious sides:
1. Classic Sides
- French fries or sweet potato fries (crispy and satisfying).
- Roasted veggies (zucchini, bell peppers, or asparagus for a healthy touch).
2. Light & Fresh Options
- Green salad (with a light vinaigrette to balance the richness).
- Coleslaw (adds crunch and freshness).
- Cucumber & tomato salad (refreshing and Mediterranean-inspired).
3. High-Protein Sides
- Quinoa salad (adds fiber and protein).
- Garlic butter rice (for a hearty meal).
Dipping Sauces That Pair Well
What’s a cheesy garlic chicken wrap without a dipping sauce? Try one of these flavor-packed dips:
1. Creamy & Mild Dips
- Garlic aioli (enhances the garlicky goodness).
- Ranch dressing (smooth, creamy, and cooling).
2. Tangy & Savory Options
- Marinara sauce (great for an Italian twist).
- BBQ sauce (adds a smoky sweetness).
3. Spicy & Bold Choices
- Spicy sriracha mayo (for heat lovers).
- Buffalo sauce (adds heat and tang).
With these sides and dips, you can enjoy a complete, restaurant-style meal right at home!
Now that you’ve got plenty of delicious variations and serving ideas, let’s move on to storing and reheating your wraps properly!
Storage & Reheating Guide
Made extra cheesy garlic chicken wraps? No worries! These wraps store and reheat beautifully, making them perfect for meal prep or quick snacks. Here’s how to keep them fresh and reheat them properly without losing their delicious flavor and texture.
Keeping Leftovers Fresh
Proper storage is key to keeping your wraps flavorful and crispy. Here’s how to do it:
1. Refrigerating Your Wraps
- Allow the wraps to cool completely before storing (to avoid sogginess).
- Wrap each wrap individually in foil, parchment paper, or plastic wrap.
- Store in an airtight container in the fridge for up to 3 days.
2. Freezing for Longer Storage
- If you want to store wraps for longer, freezing is the best option.
- Wrap each wrap tightly in plastic wrap, then place them in a ziplock bag.
- Label with the date and store in the freezer for up to 2 months.
3. Pro Tips for Freshness
- Avoid adding too much sauce inside the wrap before storing—it can make it soggy.
- Store sauces separately and add them after reheating.
Best Ways to Reheat
To bring back the crispy texture and gooey cheese, choose the best reheating method below:
1. Microwave (Quick but Soft) – 1-2 Minutes
- Wrap the wrap in a damp paper towel (to prevent dryness).
- Microwave for 1-2 minutes until warm.
- The tortilla may be soft rather than crispy.
2. Oven (Best for Crispiness) – 10-15 Minutes
- Preheat the oven to 375°F (190°C).
- Place wraps on a baking sheet and heat for 10-15 minutes until crispy.
3. Air Fryer (Best Texture) – 5-6 Minutes
- Preheat the air fryer to 375°F (190°C).
- Place the wrap inside and cook for 5-6 minutes, flipping halfway.
- This method keeps the tortilla crispy while melting the cheese inside.
4. Skillet (Crispy & Fresh) – 5 Minutes
- Heat a non-stick pan over medium heat.
- Place the wrap seam-side down and toast for 2-3 minutes per side.
- This is great for making wraps extra crispy.
Nutritional Information
Want to know the nutrition breakdown for cheesy garlic chicken wraps? Here’s a general estimate for one wrap (may vary based on ingredients and portion sizes):
| Nutrient | Amount per Wrap |
|---|---|
| Calories | ~450-500 kcal |
| Protein | ~35g |
| Total Fat | ~20g |
| Saturated Fat | ~8g |
| Carbohydrates | ~40g |
| Fiber | ~4g |
| Sugar | ~2g |
| Sodium | ~600mg |
How to Make it Healthier:
- Use whole wheat or low-carb tortillas to reduce carbs.
- Swap regular cheese for reduced-fat or dairy-free cheese.
- Add more veggies for extra fiber and nutrients.
Frequently Asked Questions (FAQs) ❓
1. Can I make these wraps ahead of time?
Yes! These wraps are great for meal prep. Assemble them and store them in the fridge for up to 3 days or freeze for longer storage. If prepping ahead, store sauces separately to prevent sogginess.
2. What’s the best way to reheat leftovers?
For the best crispiness, use the oven, air fryer, or skillet. The microwave works, but the wrap will be soft instead of crispy.
3. Can I freeze the wraps?
Absolutely! Wrap them individually in plastic wrap and store in a ziplock bag in the freezer for up to 2 months. Reheat directly from frozen using the oven or air fryer.
4. How can I make a gluten-free version?
To make these wraps gluten-free, simply use gluten-free tortillas (available in most grocery stores) or wrap them in lettuce leaves instead.
5. What other sauces pair well with these wraps?
Some great sauce options include:
- Garlic aioli (for extra garlicky flavor)
- Buffalo sauce (for a spicy kick)
- Ranch dressing (creamy and tangy)
- Marinara sauce (for an Italian twist)
Conclusion
Cheesy garlic chicken wraps are the perfect combination of crispy, cheesy, and garlicky goodness. Whether you’re making them for a quick lunch, a family dinner, or meal prep, they’re guaranteed to satisfy your cravings. With juicy chicken, melty cheese, and bold garlic flavor, every bite is packed with mouthwatering taste.
One of the best things about these wraps is how versatile they are! You can switch up the ingredients to fit your dietary preferences—whether you want a low-carb, vegetarian, or extra spicy version. Plus, they store and reheat well, making them a great option for make-ahead meals.
Now it’s your turn! Try this recipe and let me know how it turned out. Experiment with different cheeses, sauces, and spice levels to make them your own. Share your favorite variations and serving ideas—I’d love to hear how you customized your wraps!
Happy cooking, and enjoy your cheesy garlic chicken wraps!
Cheesy Garlic Chicken Wraps – The Ultimate Flavor-Packed Meal
Equipment
- 1 Non-stick skillet For cooking the wraps
- 1 Spatula For flipping and pressing the wrap
- 1 Knife For slicing the chicken
- 1 Mixing Bowl For marinating the chicken
Ingredients
For the Chicken
- Amount Unit Name Notes
- 2 medium Chicken breasts Boneless skinless, sliced into strips
- 1 tbsp Olive oil For cooking
- 1 tsp Garlic powder For seasoning
- 1 tsp Paprika Adds a smoky kick
- ½ tsp Salt Adjust to taste
- ½ tsp Black pepper Freshly ground
- ½ tsp Red pepper flakes Optional for spice
For the Wraps
- Amount Unit Name Notes
- 4 large Flour tortillas Whole wheat or gluten-free alternatives work too
- 1 cup Shredded mozzarella cheese For a gooey melt
- ½ cup Shredded cheddar cheese Adds sharpness
- 1 tbsp Butter For toasting the tortillas
For the Garlic Sauce
- Amount Unit Name Notes
- ½ cup Mayonnaise Base for the sauce
- 2 tbsp Sour cream Or Greek yogurt for a healthier version
- 1 tsp Fresh garlic Minced or grated
- ½ tsp Lemon juice Adds brightness
- ¼ tsp Salt Adjust to taste
- ½ tsp Dried oregano Optional
Optional Add-ins
- Amount Unit Name Notes
- ½ cup Spinach Adds a nutritious touch
- ¼ cup Sun-dried tomatoes For a sweet tangy burst
- ½ cup Cooked turkey or ham For extra protein
- 2 tbsp Pesto Adds depth of flavor
Instructions
Step 1: Prepare the Chicken
- In a mixing bowl, combine the sliced chicken with olive oil, garlic powder, paprika, salt, black pepper, and red pepper flakes.
- Let it marinate for at least 15 minutes (or up to 2 hours for deeper flavor).
- Heat a non-stick skillet over medium heat and cook the chicken for 5-7 minutes, stirring occasionally, until golden brown and fully cooked.
- Remove from heat and set aside.
Step 2: Make the Garlic Sauce
- In a small bowl, whisk together mayonnaise, sour cream, minced garlic, lemon juice, salt, and oregano.
- Adjust seasoning to taste and let it sit for 5-10 minutes to blend flavors.
Step 3: Assemble the Wraps
- Lay a flour tortilla flat on a clean surface.
- Spread a thin layer of garlic sauce over the tortilla.
- Add a generous portion of cooked chicken and shredded cheese (mozzarella + cheddar).
- (Optional) Add spinach, sun-dried tomatoes, or pesto for extra flavor.
- Fold the tortilla in half (for a quesadilla-style wrap) or fold in the sides and roll it up tightly.
Step 4: Toast the Wraps
- Heat a non-stick skillet over medium-low heat and brush lightly with butter.
- Place the wrap seam-side down and cook for 2-3 minutes per side, pressing gently with a spatula until golden brown and crispy.
- Repeat for all wraps.
Step 5: Serve and Enjoy!
- Slice the wraps in half and serve with extra garlic sauce, ranch, or spicy mayo for dipping.
- Enjoy with fries, a fresh salad, or roasted veggies!
Nutrition (Per Serving)
- Nutrient Amount
- Calories 450-500 kcal
- Protein 35g
- Fat 20g
- Saturated Fat 8g
- Carbohydrates 40g
- Fiber 4g
- Sugar 2g
- Sodium 600mg
Recipe Notes
- For a Crispier Wrap: Cook on medium-low heat and press down with a spatula while toasting.
- For Dairy-Free Version: Use vegan cheese and replace sour cream with dairy-free yogurt.
- For Gluten-Free Option: Use gluten-free tortillas or wrap in lettuce.
- For a Spicy Kick: Add sriracha mayo or extra red pepper flakes to the sauce.
- Best Side Pairings: Serve with Greek salad, lentil soup, or roasted vegetables.
Storage & Reheating
Refrigeration:
- Store leftover wraps in an airtight container in the fridge for up to 3 days.
- Keep the sauce separate to prevent sogginess.
Freezing:
- Wrap each wrap individually in plastic wrap, then store in a ziplock bag for up to 2 months.
Reheating:
- Oven (Best for Crispiness): Bake at 375°F (190°C) for 10-15 minutes.
- Air Fryer: Heat at 375°F (190°C) for 5-6 minutes, flipping halfway.
- Skillet: Toast on medium heat for 2-3 minutes per side.
- Microwave: Heat for 1-2 minutes, but note that the wrap will be softer.
Frequently Asked Questions (FAQs)
- Can I make these wraps ahead of time?
- Yes! Assemble the wraps and store in the fridge for up to 3 days. Keep sauces separate for best freshness.
- What’s the best way to reheat them?
- For best results, use the oven, air fryer, or skillet to retain crispiness.
- Can I freeze them?
- Absolutely! Wrap individually in plastic wrap, place in a freezer bag, and store for up to 2 months.
- What other cheeses can I use?
- Try Monterey Jack, provolone, or pepper jack for different flavors.
- Can I make these vegetarian?
- Yes! Swap the chicken for tofu, mushrooms, or chickpeas and use vegan cheese.